Technische Infos/OpenShift
About this documentation
This documentation is meant to provide useful information about how to operate your OpenShift cluster. The goal of this documentation is to provide examples of how to deploy a project and best practices. Most of the examples make use of the Command Line Interface (CLI).
In addition, Red Hat provides an excellent documentation about OpenShift, so it could be a good starting point. Also, there you are going to find plenty of information about many different topics and configurations that you may are interested in. An other documentation you could read is the underline engine of OpenShift, kubernetes (k8s).
At the examples, replace the values inside the following (<< >>) with your values.
Finally, noris networks believes there is always room for improvement, so we would appreciate your feedback. Please, do not hesitate to contact us at support@noris.de
Command Syntax Conventions
The conventions used to present command syntax in this documentation. The Command Reference describes these conventions as follows:
- These characters (<< >>) indicate user change to the command
Getting started with OpenShift
Login
There are two options to login to your OpenShift cluster:
- Web interface: you need a browser to access your cluster
- CLI: you need a terminal to access your cluster
Web Interface
Open the server URL
Choose the correct identity provider (IDP). Hint: Don’t use “noris” because this is used by system-admins of noris network.
Type in your username and the password.


You are now logged in.
CLI
Requirements
Every command on OpenShift starts with oc. Thus, the oc command must be installed on your computer. This command is also known as OpenShift CLI tools.
Install OpenShift CLI tools
The easiest way to install OpenShift CLI tools is by downloading it from your OpenShift website:
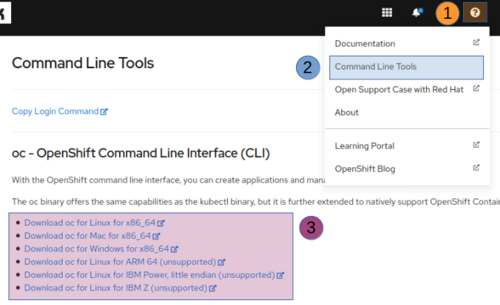
Open a browser and login at your OpenShift cluster
At the top right corner of your screen click on the question mark icon
From the dropdown menu, click on the second option, named “Command Line Tools”
A new page will open in which you can download the package which matches your Operation System (OS)

Login
Once, the OpenShift CLI tools is installed, use the oc login command to login.
$ USERNAME=<<USERNAME>>
$ oc login -u ${USENAME} -s https://api.<<MY_DOMAIN>>:6443
Hint: You should have received the credentials and the server URL via e-mail.
$ USERNAME=<<USERNAME>>
$ oc login -u ${USENAME} -s https://api.<<MY_DOMAIN>>:6443

Authentication required for SERVERNAME (openshift)
Username: USERNAME
Password: <PASSWORD>
Login successful.

You have access to 3 projects, the list has been suppressed.
You can list all projects with 'oc projects'

Using project "test".
You are now logged in.
Red Hat Single Sign-On
Keycloak (Red Hat Single Sign-On) is used to authenticate users. For instance, you can set up your Identity Provider (IDP) or create accounts by setting username/ password. In addition, you can set up Two-Factor Authentication (2FA) and much more.
You have to use your OpenShift credentials in order to login.
Hint: The credentials of the first user have been sent to the email address that is specified at the order. Normal users can not create or modify any setting. Also, do not delete the first account before you create a new user and grant that account the realm admin privilege. Remember: you can use restful calls.
That account is granted with the nn-customer-admin privileges.
Remember: do not delete that email, before you create additional accounts.
Create account
- Login to the keycloak service
- Select Users
- Select Add user

On the next screen, you should fill in the details of the new account.

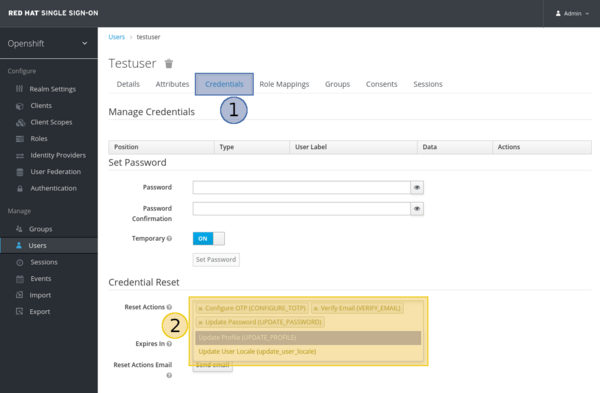
Notify user
Next, you have to notify the user about the new account and set some options:
- Select “Credentials”
- Choose the operation(s) that you want the user to take by clicking on the “Reset Actions”
- Press the “Send email” button
Most options are self-explaining and it is advised to select at least the following:
- Verify Email An email will be sent to the user which will contain a link to get verified
- Update Password The user will be prompted to update his/ her password
- Configure OTP (2FA) Once the user enter his/her credentials, he/ she will be asked to configure Two-Factor Authentication (2FA). For instance: FreeOTP or Google Authenticator

Setup a password (optional)
Optionally, you can specify a password for a selected account:
- Select “Users”, which can be found at the left sidebar
- Select the user
- Select the tab named “Credentials”
- Set a password
Hint: If you want to prompt the user to change its password, set the “Temporary” option to “ON”.
If you want to set some rules for the passwords:
- Select “Authentication”, which can be found at the left sidebar
- Select the tab named “Password Policy”
- Select “Add policy” and choose an item from the dropdown list
- Review policies and press “Save”
The same procedure can be followed to set One Time Password (OTP/ 2FA) policies.

Grant an account admin realm privilege
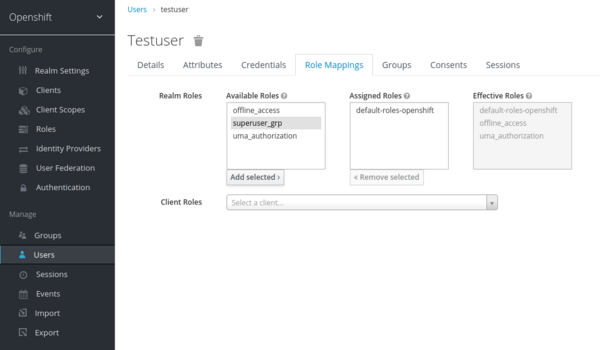
If you want an account to be able to manage the OpenShift realm:
- Login to the keycloak service
- Select “Users”
- Select the user that you want to give the privileges to. At the following example, the chosen account is named “OpenShift-user”
- Select the “Role Mappings” tab
- Select the “superuser_grp” from the “Available Roles”
- Press the “Add selected” button

If you want to revoke the admin realm privilege from an account, do the above steps. Only the last two step are different:
- Select the “superuser_grp” from the “Assigned Roles”
- Press the “Remove selected” button
Configure an Active Directory (AD)
You can configure keycloak to work with your AD:
- Login to the keycloak service
- Select “User Federation”
- Select the option “ldap” from the dropdown menu
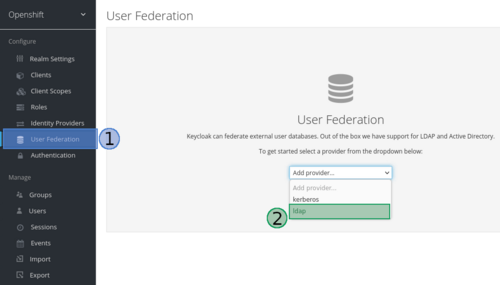
- Fill in the form to match your setup:
- Enter a name which will be displayed at your login screen. This is displayed only if you have more than one IDP
- There are three options, but in most cases the option “READ_ONLY” is used
- The rest of the options depend on your AD setup
- Expand the “Sync Settings”
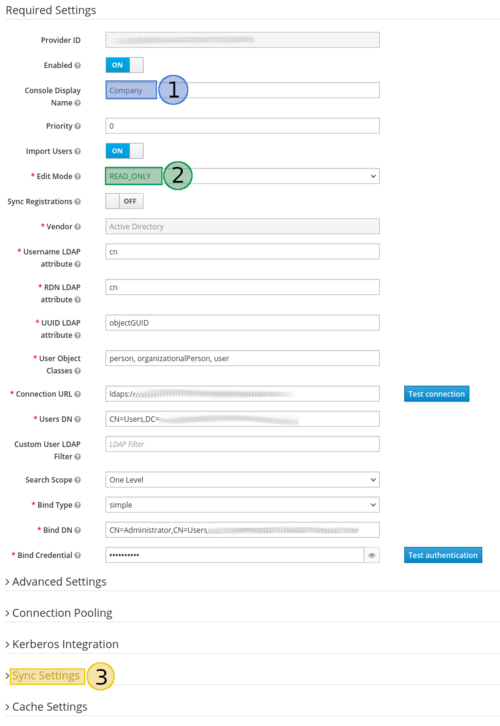
- Set those options to “ON”, if you want the keycloak to synchronize with your AD and abjust the intervals

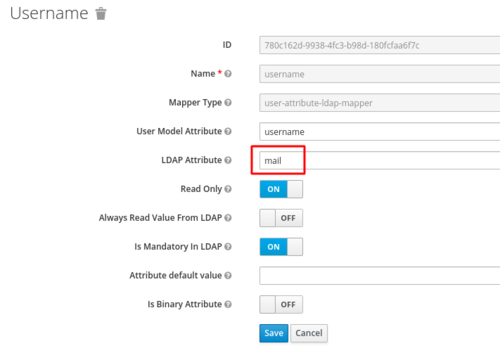
- Edit these mappers to change AD attributes at keycloak (Only for existing LDAP):
- Click on mappers
- Pick the one you want to change Below, there is an example on how to change “username” to “mail” for login.


Grant privileges to users
You can assign one of the following roles to the accounts of your cluster:
- admin: make an account admin of the specific project
- edit: give the privilege to an account to deploy objects in a specified project except roles and bindings
- view: give the privilege to an account to only view objects in a specified project except roles and bindings
You can assign the above roles by the following command:
oc adm policy add-role-to-user <<role>> <<my-username>> -n <<project>>
For instance, give the edit privilege to the account with the username “my-username” in the project named “my-new-project”:
$ oc adm policy add-roles-to-user edit my-username -n my-new-project
In order to manage your users authorization better, there have been created six different groups:
- nn-capacity-management
- nn-self-provisioner
- nn-namespace-viewer
- nn-resources-mgmt
- nn-group-manager
- nn-customer-admin
Each group has its unique privileges.
Hint: Those privileges can be assigned to users via CLI
nn-capacity-management
Allows a user to monitor cluster resources via capacity management.
$ USERNAME=<<USERNAME>>
$ oc adm groups add-users nn-capacity-management ${USERNAME}
nn-self-provisioner
Allows a user to create new projects.
$ USERNAME=<<USERNAME>>
$ oc adm groups add-users nn-self-provisioner ${USERNAME}
nn-namespace-viewer
Allows a user to view all the namespaces of the cluster.
$ USERNAME=<<USERNAME>>
$ oc adm groups add-users nn-namespace-viewer ${USERNAME}
nn-resources-mgmt
Allows a user to manage the resourcequotas and limitranges of all the projects which have been created by any custom account.
$ USERNAME=<<USERNAME>>
$ oc adm groups add-users nn-resources-mgmt ${USERNAME}
nn-group-manager
Allows a user to add or remove users from the following groups:
- nn-capacity-management
- nn-self-provisioner
- nn-namespace-viewer
- nn-resources-mgmt
- nn-group-manager
- nn-customer-admin
$ USERNAME=<<USERNAME>>
$ oc adm groups add-users nn-group-manager ${USERNAME}
Next, that user should be able to manage those groups. For instance:
To add users to a group:
$ oc adm groups add-users <<NAME-OF-THE-GROUP>> <<USERNAME_1>> <<USERNAME_2>>
To remove users from a group:
$ oc adm groups remove-users <<NAME-OF-THE-GROUP>> <<USERNAME_1>> <<USERNAME_2>>
nn-customer-admin
Allows a user to have all the above privileges. In addition, grants a user the permissions to create resourcequotas objects.
$ USERNAME=<<USERNAME>>
$ oc adm groups add-users nn-customer-admin ${USERNAME}
Examples
Role and group
We need the user1 to be able to:
- Create new objects inside the prj-example project. The project is already present
- Edit resourcequotas and limitranges objects
User1 has been given the following role(s) to the project “prj-example” and is member of group(s):
- edit (role)
- nn-resources-mgmt (group)
Therefore user1 will be able to create new objects inside that prj-example project except roles and bindings. In addition, user1 can edit resourcequotas and limitranges objects of every project which has been created by him or from any other user.
Multiple groups
We need a user who will be able to:
- Edit resources of all projects
- Create new projects
User2 has been given the following roles/ is member of group:
- nn-self-provisioner (group)
- nn-resources-mgmt (group)
- nn-namespace-viewer (group, optional)
Therefore this account will be able to create new projects. Also, it would be able to edit resourcequotas and limitranges objects of every project which has been created by itself or any other user. Optionally, you could give that account the privilege to retrieve a list of all projects.
Quickstart
New Project
The first project is named default. Use the oc new-project command to create a new project.
$ oc new-project my-new-project
Now using project "my-new-project" on server "https://api.<<MY_DOMAIN>>:6443".
Create New App
Firstly, you verify that you work on the correct project, then you deploy the new application.
$ oc project
Using project "my-new-project" on server "https://api.<<MY_DOMAIN>>:6443".
Build image
Create an image from a specific repository:
$ oc new-build php~https://github.com/noris-network/sample-code
Apply resource limits and quotas for the image creation:
$ oc patch buildconfig sample-code -p '{"spec":{"resources": {"requests": {"cpu": "100m","memory": "100Mi"},"limits": {"cpu": "200m","memory": "200Mi"}}}}'
  buildconfig.build.openshift.io/sample-code patched
  $ oc delete build sample-code-1
  build.build.openshift.io "sample-code-1" deleted
  $ oc start-build sample-code
  build.build.openshift.io/sample-code-2 started
  $ oc get pod
  NAME                          READY   STATUS      RESTARTS   AGE
  sample-code-2-build           0/1     Completed   0          116m
Once, the status of the oc get pod command is set to “Completed”, you will be able to continue to the next step.
Deploy code
Deploy code and apply resource limits and quotas:
$ oc new-app image-registry.openshift-image-registry.svc:5000/my-new-project/sample-code --allow-missing-images
  ...
  $ oc patch deploy sample-code  -p '{"spec": {"template": { "spec": {"containers": [ {"name":"sample-code","image":"image-registry.openshift-image-registry.svc:5000/my-new-project/sample-code","resources":{"requests": {"cpu":"100m","memory": "100Mi"},"limits":{"cpu":"100m","memory":"100Mi"}}}]}}}}'
  deployment.apps/sample-code patched
View pods
Use the oc get pod to view the status of the pods of the current project.
$ oc get pod
NAME              READY   STATUS    RESTARTS   AGE
sample-code-1-build   1/1     Running   0          70s
Expose the App
Use the oc expose command to make your application accessible from the internet.
$ oc expose service sample-code
route.route.openshift.io/sample-code exposed
Access it from: http://sample-code-my-new-project.apps.<<MY_DOMAIN>>
Enable Secure Connections
Use the following command to enable secure connections on your application.
$ oc patch route sample-code -p '{"spec":{"tls":{"termination":"edge"}}}'
  route.route.openshift.io/sample-code patched
Scale the App
Use the oc scale command to set the replication number of a pod.
$ oc scale deploy/sample-code --replicas=2
deployment.apps/sample-code scaled
$ oc get pod
NAME                       READY   STATUS      RESTARTS   AGE
sample-code-1-build            0/1     Completed   0          85m
sample-code-55856d4455-9cqpf   1/1     Running     0          82m
sample-code-55856d4455-vjd89   1/1     Running     0          55s
Beginning with OpenShift
New Project
A Project is a special object which provides isolation regarding resources. Every project gets its own resources and it cannot be affected by any other project. You can create new projects by running the following command:
oc new-project <<MY-NEW-PROJECT>>
Keep in mind that you need to be a user inside the group nn-self-provisioner.
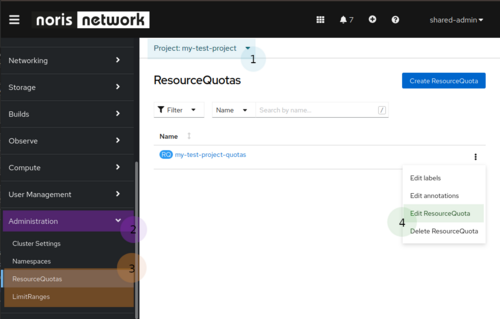
Ways to modify ResourceQuotas / LimitRanges via GUI or CLI:
GUI
- Select the project, you are interested in
- Scroll down on the left side of the console and click on “Administration”
- Select the object type, you want to edit:
- ResourceQuotas
- LimitRanges
- Click on the “Edit” option from the dropdown menu

CLI
oc edit ResourceQuota <<NAME>> -n <<NAMESPACE>>
oc edit LimitRange <<NAME>> -n <<NAMESPACE>>
Pod
Pods are the smallest, most basic and most ephemeral objects in OpenShift. A pod can contain one or more than one containers. You can configure a pod to use pesistent storage and limit. In most cases, you will not deploy a pod object. Pod objects are mostly used to test a configuration quickly.
If a pod object is deployed and then it is deleted, it will not be recreated.
Hint: Pods can be created and managed from other objects such as deployment objects.
Save your Data
OpenShift does not store any data by default, hence if a pod is deleted, its data will be lost. Even if the pod is recreated, it will not be created with any data. However, this issue can be easily resolved by creating an additional object (PVC) and adding a few snippets of code at your object’s configuration.
Build strategies
OpenShift provides a few mechanisms to control container images (the terminology of docker images might be confusing, so it will be avoided). OpenShift has an internal container image registry to store the images that are used or built. There are two commands to build images:
- oc new-build
- oc new-app
Both commands are somewhat similar in function. Both create buildconfiguration and image stream (is for short). However, the latter creates additionally some OpenShift resources such as Service and DeploymentConfig.
In addition, there are two different strategies to create images:
Source-to-Image
S2I is an alternative option to Docker build (Dockerfile). It builds container images of applications in a fast, flexible and reproducible way. It produces images by injecting application source code into the container image.
The oc new-build command is used to create images.
$ oc new-build <<BUILDER-IMAGE>>~<<GIT-REPOSITORY>> --strategy=source --name=<<IMAGE-NAME>>
 $ oc patch buildconfig <<IMAGE-NAME>> -p '{"spec":{"resources": {"requests": {"cpu": "<<CPU-VALUE>>m","memory": "<<MEMORY-VALUE>>Mi"},"limits": {"cpu": "<<CPU-VALUE>>m","memory": "<<MEMORY-VALUE>>Mi"}}}}'
 $ oc start-build <<IMAGE-NAME>>
 $ oc delete build <<IMAGE-NAME>>-1
$ oc new-build php~https://github.com/noris-network/sample-code --strategy=source --name=my-image-s2i
   $ oc patch buildconfig my-image-s2i -p '{"spec":{"resources": {"requests": {"cpu": "100m","memory": "100Mi"},"limits": {"cpu": "200m","memory": "200Mi"}}}}'
   $ oc start-build my-image-s2i
   $ oc delete build my-image-s2i-1
   $ oc get is
  NAME                   IMAGE REPOSITORY                                                                                           TAGS     UPDATED
  my-image-docker       default-route-openshift-image-registry.apps.<<MY_DOMAIN>>/my-new-project/my-image-docker   latest   15 minutes ago
  my-image-s2i          default-route-openshift-image-registry.apps.<<MY_DOMAIN>>/my-new-project/my-image-s2i
Docker build
The docker build strategy expects a Dockerfile to be present at the repository. It will be used the same command as in S2I, oc new-build but it uses different parameters.
$ oc new-build <<GIT-REPOSITORY>> --strategy=docker --name=<<IMAGE-NAME>>
 $ oc patch buildconfig <<IMAGE-NAME>> -p '{"spec":{"resources": {"requests": {"cpu": "<<CPU-VALUE>>m","memory": "<<MEMORY-VALUE>>Mi"},"limits": {"cpu": "<<CPU-VALUE>>m","memory": "<<MEMORY-VALUE>>Mi"}}}}'
 $ oc start-build <<IMAGE-NAME>>
 $ oc delete build <<IMAGE-NAME>>-1
$ oc new-build https://github.com/noris-network/sample-code#dockerfile-sample --strategy=docker --name=my-image-docker
   $ oc patch buildconfig my-image-docker -p '{"spec":{"resources": {"requests": {"cpu": "100m","memory": "100Mi"},"limits": {"cpu": "200m","memory": "200Mi"}}}}'
   $ oc start-buildmy-image-docker
   $ oc delete build my-image-docker-1
   $ oc get is
  NAME                   IMAGE REPOSITORY                                                                                           TAGS     UPDATED
  my-image-docker   default-route-openshift-image-registry.apps.<<MY_DOMAIN>>/my-new-project/my-image-docker   latest   9 minutes ago
For further reading, please visit Red Hat documentation.
Dealing with certificates
You should know the public IP of your cluster.
$ host app1.apps.<<MY_DOMAIN>>
app1.apps.<<MY_DOMAIN>> has address xxx.xxx.xxx.xxx
You should create an A record of your domain to the above IP.
Next, download the certificates to your computer. At the example below, certificates are present in ~/Downloads/.
Everything is set to create the route which will use the selected certificates.
$ HOSTNAME=<<HOSTNAME>>
$ oc create route edge --service=sample-code \
   --cert ~/Downloads/my.crt \
   --key ~/Downloads/priv.key \
   --ca-cert ~/Downloads/ca.crt \
   --hostname=${HOSTNAME}
Access to Red Hat Knowledge base
Red Hat provides a knowledge base which holds "subscriber exclusive content" for example https://access.redhat.com/solutions/6563931. When searching for issues via popular search engines, its common to encounter these articles, but sadly they aren't directly accessible.
Noris network customers can circumvent this restriction by requesting a Developer subscription for individuals from Red Hat, its free and runs a whole year. After that year expires, it can be requested again.
Before you request that license, Red Hat advises to read the following articles:
How do I get the no-cost Red Hat Enterprise Linux Developer Subscription or renew it?
https://access.redhat.com/solutions/4078831
Red Hat Developer Program Terms and Conditions
https://developers.redhat.com/terms-and-conditions
No-cost Red Hat Enterprise Linux Individual Developer Subscription: FAQs
https://developers.redhat.com/articles/faqs-no-cost-red-hat-enterprise-linux
Storage
OpenShift does not save any data permanently, unless it is instructed to do so. This means that if a pod is destroyed by any means, the data will be lost forever. Thus, Persistent Volume (PV) and Persistent Volume Claim (PVC) should be used.
In most cases only a PVC should be created and defining a Storage Class (SC). In addition, SC lets you define how that PVC should operate. For instance, I would like my PVC to have the read-write permission by a single node. Those requests can be satisfied by the accessModes.
Remember: Each SC supports different accessModes.
Persistent Volume (PV)
A PV is a piece of storage which can be created by the administrator or can be dynamically provisioned by a SC. Then, this object can be attached to a PVC.
It is unlikely to create a PV object by your own, because PVs are automatically created by SC which are defined at a PVC object.
Persistent Volume Claim (PVC)
A PVC object must be created in order for your data to be saved permanently. Next, this PVC will be used by pods to request a storage/PV with some specific characteristics. For instance, at the following code, a storage is requested, named my-pvc, having 3Gi of space and it is attached to a pod named my-pvc-pod.
$ cat << EOF | oc create -f -
apiVersion: v1
kind: PersistentVolumeClaim
metadata:
 name: my-pvc
spec:
 storageClassName: thin
 accessModes:
   - ReadWriteOnce
 resources:
   requests:
     storage: 3Gi
EOF
Next, a pod is created, making use of that PVC.
$ cat << EOF | oc create -f -
apiVersion: v1
kind: Pod
metadata:
 name: my-pvc-pod
spec:
 containers:
   - name: task-pv-container
     image: busybox
     resources:
       requests:
         memory: "64Mi"
         cpu: "100m"
       limits:
         memory: "128Mi"
         cpu: "200m"
     command: [ "sleep", "300"]
     volumeMounts:
       - mountPath: "/mnt"
         name: my-data
 volumes:
 - name: my-data
   persistentVolumeClaim:
     claimName: my-pvc
EOF
Storage Class (SC)
In the previous example, a SC was specified in the PVC, meaning that you do not have to take any additional actions, like to create a PV. This is automatically done by OpenShift.
There are two types of SC:
- thin: is a block storage type and the default value of the SC. If you do not specify a SC, the thin SC will be used.
- netapp: is a file storage type
The storage type subject is out of the scope of this documentation. However, you can find more information here.
Extra info: There are some applications which operate using S3 storage. Those applications do not create PVC to store their data. But a S3 configuration should be present. There are a few ways to setup a S3 configuration, for instance:
- configmap
- environment variables
- secrets
An example of a configmap could be like:
---
kind: ConfigMap
apiVersion: v1
metadata:
  name: s3-conf
data:
  s3.conf: |-
    [default]
    host_base = s3.host.url
    host_bucket = %(bucket)s.s3.host.url
    cloudfront_host = s3.host.url
    simpledb_host = s3.host.url
    use_https = True
    access_key = my-key
    secret_key = my-secret-key
accessModes
The option accessModes can be set to one of following, depending on the SC:
- ReadWriteOnce (RWO): is mounted as read-write by a single node. It can be used with both SC.
- ReadWriteMany (RWX): is mounted as read-write by many nodes. It can be used only with the netapp SC.
- ReadOnlyMany (ROX): is mounted as read-only by many nodes. It can be used only with the netapp SC.
Example
The following example creates a PVC using the thin SC and sets the accessMode to ReadWriteOnce. If the thin SC is used with the RWX accessMode, an error will occur.
$ cat << EOF | oc create -f -
---
kind: PersistentVolumeClaim
apiVersion: v1
metadata:
 name: example-pvc
spec:
 storageClassName: thin
 accessModes:
   - ReadWriteOnce
 resources:
   requests:
     storage: 1Gi
EOF
Compare accessModes and Storage Classes
Beside the difference of the accessModes between the two SC, there is a significant difference on the performance:
The following metrics are produced by the fio command between the thin and the netapp SC using the RWO and the RWX accessModes.
| Test-accessMode | thin-RWO | netapp-RWO | netapp-RWX |
|---|---|---|---|
| Random Read/Write IOPS |
55.2k/43.8k. 1072MiB/s / 1153MiB/s |
26.3k/26.3k. 110MiB/s / 108MiB/s |
25.1k/26.4k. 106MiB/s / 107MiB/s |
| Average Latency (usec) Read/Write |
268.77/292.49 | 735.37/814.38 | 807.79/830.78 |
| Sequential Read/Write | 1049MiB/s / 1113MiB/s | 109MiB/s / 108MiB/s | 106MiB/s / 110MiB/s |
| Mixed Random Read/Write IOPS |
37.5k/12.5k | 26.3k/8753 | 25.4k/8509 |
The table above shows that RWO on the thin SC can be at about 10 times faster than the netapp SC and it has much less latency, which could be crucial parameter at some applications.
Examples
The examples below should not be used in production.
SC: thin, RWO
In this example a MySQL instance will be created and the persistent storage will be 1Gb. The SC can be omitted, because it is set to thin (default value) and the accessMode is set to RWO.
$ cat << EOF | oc create -f -
---
kind: PersistentVolumeClaim
apiVersion: v1
metadata:
 name: mysql-pvc
spec:
 storageClassName: thin
 accessModes:
   - ReadWriteOnce
 resources:
   requests:
     storage: 1Gi
---
apiVersion: apps/v1
kind: StatefulSet
metadata:
 name: mysql
spec:
 replicas: 1
 selector:
   matchLabels:
     app: mysql
 template:
   metadata:
     labels:
       app: mysql
   spec:
     containers:
     - image: mysql:8
       name: mysql
       resources:
         limits:
           cpu: 100m
           memory: 200Mi
         requests:
           cpu: 100m
           memory: 100Mi
       env:
       - name: MYSQL_ROOT_PASSWORD
         value: top-secret
       ports:
       - containerPort: 3306
         name: mysql
       volumeMounts:
       - name: mysql-data
         mountPath: /var/lib/mysql
     volumes:
     - name: mysql-data
       persistentVolumeClaim:
         claimName: mysql-pvc
EOF
SC: netapp, RWX
This deployment will use a busybox image to create two pods. The same PVC will be mounted to both pods at the following path /srv/data. Data which are created by one pod will be present to the other. To achieve that, the netapp SC is used and the accessMode has been set to RWX.
$ cat << EOF | oc create -f -
---
kind: PersistentVolumeClaim
apiVersion: v1
metadata:
 name: busybox-pvc
spec:
 storageClassName: netapp
 accessModes:
   - ReadWriteMany
 resources:
   requests:
     storage: 1Gi
---
apiVersion: apps/v1
kind: Deployment
metadata:
 name: my-busybox
spec:
 replicas: 2
 selector:
   matchLabels:
     app: my-busybox
 template:
   metadata:
     labels:
       app: my-busybox
   spec:
     containers:
     - image: harbor.prod.paas.pop.noris.de/dockerhub/library/busybox
       name: busy
       resources:
         requests:
           memory: "64Mi"
           cpu: "100m"
         limits:
           memory: "128Mi"
           cpu: "200m"
       command: ['sh', '-c', 'echo The app is running! && sleep 36000']
       volumeMounts:
       - name: busybox-data
         mountPath: /srv/data
     volumes:
     - name: busybox-data
       persistentVolumeClaim:
         claimName: busybox-pvc
EOF
oc patch deployment sample-code -p ‘{“spec”: {“template”: {“spec”: {“containers”:[{“resource”:{""}}]} }}}’
oc set image deployment/sample-code sample-code=default-route-openshift-image-registry.apps.ldim-pop.noris.de/my-new-project/sample-code
Network Isolation
The OpenShift clusters provided by noris network use either the OpenShiftSDN or the OVN SDN (Software-defined networking). Both SDN implementations allow any kind of traffic in the cluster (pod to pod, namespace to namespace, internal to external, external to internal). If you want to filter ingress or egress traffic of your OpenShift project, then you need to use NetworkPolicies.
You can find a very good documentation about the Network Policies in the OpenShift documentation.
Network Policies
If you want to limit the traffic to your project to the OpenShift-ingress pods (Route/Ingress objects), then you could use the following policies.
Deny by default
If you want to deny all traffic to pods of a project:
kind: NetworkPolicy
apiVersion: networking.k8s.io/v1
metadata:
  name: deny-by-default
spec:
  podSelector:
  ingress: []
Allow from OpenShift Ingress
Use the following NetworkPolicy, if you want to allow connections to your project from the OpenShift Ingress controller. The default endpoint publishing strategy for clusters managed by noris network is HostNetwork. In addition, the default namespace has an additional annotation (network.openshift.io/policy-group: ingress) to identify the traffic.
apiVersion: networking.k8s.io/v1
kind: NetworkPolicy
metadata:
  name: allow-from-openshift-ingress
spec:
  ingress:
  - from:
    - namespaceSelector:
        matchLabels:
          network.openshift.io/policy-group: ingress
  podSelector: {}
  policyTypes:
  - Ingress
Allow traffic from pods within a project
If you want to allow traffic between pods within a project:
kind: NetworkPolicy
apiVersion: networking.k8s.io/v1
metadata:
  name: allow-same-namespace
spec:
  podSelector:
  ingress:
  - from:
    - podSelector: {}
Egress IPs
Egress IPs allow you to assign one or more IP addresses to a namespace or specific pods in a namespace. The egress IP address functionality allows you to ensure that the traffic from one or more pods in one or more namespaces has a consistent source IP address for services outside the cluster network. This allows more granular network firewalling rulesets. They can be requested by issuing service requests to noris.
Best Practices
It is recommended to follow some rules to get the maximum experience in OpenShift.
Deploy an Application
There are many kinds of objects in OpenShift which can be used to deploy an application. Depending on your goal, you should use one of the following objects:
- deamonset
- deployment
- deploymentconfig
- statefulset
The pod is not included at the list above. It is not a good practice to deploy applications using pod objects. Pods are considered the simpler and the most ephemeral objects. If a pod object is deleted and it was not managed by any other object, it will not be recreated.
Replication
It is considered a great practice to set replicates of your deployments. There a few reason, you should do that and set your replication higher than one:
- Reliability: having multiple instances of your pods is highly recommended. A pod can be deleted due to node upgrades or application updates. So, replication ensures that the application will continue to be functional by creating new pods
- Load balancing: OpenShift can redirect network traffic, if you have high traffic on one of your nodes
- Scaling: you can share the load of your application between the pods
Requests and Limits
It is considered a good practice to use resources/requests and resources/limits in your objects. This can prevent the unfortunate situation of a pod to consume a high amount of resources making the node unstable. Remember, the values of the limits must be equal or higher from the values of requests.
The following example instructs OpenShift to create a pod with guaranteed 250m CPU and 64Mi RAM but the pod should not use more than 500m CPU and 128Mi RAM.
$ cat << EOF | oc create -f -
apiVersion: v1
kind: Pod
metadata:
 name: my-pvc-pod
spec:
 containers:
   - name: my-pod-resources
     image: busybox
     resources:
       requests:
         memory: "64Mi"
         cpu: "250m"
       limits:
         memory: "128Mi"
         cpu: "500m"
     command: [ "sleep", "300"]
EOF
LimitRanges
On project level you can also define the LimitRange object. With Limit Ranges the following can be achieved.
- Minimum and maximum values for requests and limit definitions in pods
- Default requests and limit definitions (if a pod is created without a requests/limits definition)
More information about limit ranges can be found here.
ResourceQuotas
In addition to Limit Ranges you can also limit the resources (memory, cpu) in a specific project with the ResourceQuota object.
More information about ResourceQuotas can be found here.
Persistent storage
Your application will not save any data permanently by default, if OpenShift is not configured to do so. As follows, the creation of PVC objects are highly recommended in order to prevent any data loss.
Dockerhub rate limits
Dockerhub has enabled restrictions on its services, for more information check the docker site:
- Anonymous users are limited to 100 container image pull requests per 6 hours
- Free dockerhub users are limited to 200 container image pull requests per 6 hours
- Docker Pro and Docker Team account can perform 50,000 pulls per 24 hours
OpenShift API Constraints
Security is of paramount importance to OpenShift. Contrary to popular kubernetes distributions, applications don't run in root context and user accounts don't obtain admin privileges.
noris network may support a customer installing OpenShift Operators as Managed Container Service; they are not part of the regular platform service offering.
Customer users will not be able to create the following clusterwide objects. If needed they can be requested via Ticket (Service Request) or as part of a Managed Container Service.
Important (sorted by perceived relevance):
customresourcedefinitions.apiextensions.k8s.io
egressips.k8s.ovn.org
podsecuritypolicies.policy
securitycontextconstraints.security.openshift.io
mutatingwebhookconfigurations.admissionregistration.k8s.io
validatingwebhookconfigurations.admissionregistration.k8s.io
clusterrolebindings.authorization.openshift.io
clusterroles.authorization.openshift.io
clusterrolebindings.rbac.authorization.k8s.io
clusterroles.rbac.authorization.k8s.io
ingressclasses.networking.k8s.io
rangeallocations.security.internal.openshift.io
rangeallocations.security.openshift.io
groups.user.openshift.io
identities.user.openshift.io
users.user.openshift.io
Likely unimportant (unsorted):
componentstatuses
nodes
apiservices.apiregistration.k8s.io
apirequestcounts.apiserver.openshift.io
clusterautoscalers.autoscaling.openshift.io
clusterissuers.cert-manager.io
certificatesigningrequests.certificates.k8s.io
cnsvspherevolumemigrations.cns.vmware.com
apiservers.config.openshift.io
authentications.config.openshift.io
builds.config.openshift.io
clusteroperators.config.openshift.io
clusterversions.config.openshift.io
consoles.config.openshift.io
dnses.config.openshift.io
featuregates.config.openshift.io
imagecontentpolicies.config.openshift.io
images.config.openshift.io
infrastructures.config.openshift.io
ingresses.config.openshift.io
networks.config.openshift.io
oauths.config.openshift.io
operatorhubs.config.openshift.io
proxies.config.openshift.io
schedulers.config.openshift.io
consoleclidownloads.console.openshift.io
consoleexternalloglinks.console.openshift.io
consolelinks.console.openshift.io
consolenotifications.console.openshift.io
consoleplugins.console.openshift.io
consolequickstarts.console.openshift.io
consoleyamlsamples.console.openshift.io
flowschemas.flowcontrol.apiserver.k8s.io
prioritylevelconfigurations.flowcontrol.apiserver.k8s.io
flowcollectors.flows.netobserv.io
helmchartrepositories.helm.openshift.io
configs.imageregistry.operator.openshift.io
imagepruners.imageregistry.operator.openshift.io
containerruntimeconfigs.machineconfiguration.openshift.io
controllerconfigs.machineconfiguration.openshift.io
kubeletconfigs.machineconfiguration.openshift.io
machineconfigpools.machineconfiguration.openshift.io
machineconfigs.machineconfiguration.openshift.io
provisionings.metal3.io
nodes.metrics.k8s.io
storagestates.migration.k8s.io
storageversionmigrations.migration.k8s.io
runtimeclasses.node.k8s.io
oauthaccesstokens.oauth.openshift.io
oauthauthorizetokens.oauth.openshift.io
oauthclientauthorizations.oauth.openshift.io
oauthclients.oauth.openshift.io
useroauthaccesstokens.oauth.openshift.io
authentications.operator.openshift.io
cloudcredentials.operator.openshift.io
clustercsidrivers.operator.openshift.io
configs.operator.openshift.io
consoles.operator.openshift.io
csisnapshotcontrollers.operator.openshift.io
dnses.operator.openshift.io
etcds.operator.openshift.io
imagecontentsourcepolicies.operator.openshift.io
kubeapiservers.operator.openshift.io
kubecontrollermanagers.operator.openshift.io
kubeschedulers.operator.openshift.io
kubestorageversionmigrators.operator.openshift.io
networks.operator.openshift.io
openshiftapiservers.operator.openshift.io
openshiftcontrollermanagers.operator.openshift.io
servicecas.operator.openshift.io
storages.operator.openshift.io
olmconfigs.operators.coreos.com
operators.operators.coreos.com
projectrequests.project.openshift.io
clusterresourcequotas.quota.openshift.io
configs.samples.operator.openshift.io
priorityclasses.scheduling.k8s.io
volumesnapshotclasses.snapshot.storage.k8s.io
volumesnapshotcontents.snapshot.storage.k8s.io
csidrivers.storage.k8s.io
csinodes.storage.k8s.io
storageclasses.storage.k8s.io
volumeattachments.storage.k8s.io
brokertemplateinstances.template.openshift.io
tridentorchestrators.trident.netapp.io
ImageStreams
An ImageStream is a collection of one or more container images identified by tags. It provides a single virtual view of related images, similar to a image repository, and may contain images uploaded directly or other image streams. An image stream and its associated tags provide an abstraction for referencing container images from within OpenShift Container Platform. If an image registry already exists, it is advisable to use it.
Example usage:
oc new-project test
oc create imagestream test
podman tag <<image:tag>> default-route-openshift-image-registry.apps.<<clusterName/imageStream/image:tag>>
podman push default-route-openshift-image-registry.apps.<<clusterName/namespace/image:tag>>
Monitoring
Currently active alterting rules can be checked at https://console-openshift-console.apps.<<clusterName>>.noris.de/monitoring/alertrules
User-Workload-Monitoring
noris will enable monitoring for user-defined projects. Once enabled, you can monitor your own projects in OpenShift Container Platform without the need for an additional monitoring solution. Using this new feature centralizes monitoring for core platform components and user-defined projects.
On a technical level, enabling user-defined monitoring deploys the following components:
- Prometheus Operator: This component is responsible for deploying and managing Prometheus instances.
- Prometheus: This component is responsible for scraping metrics from targets and storing them.
- Thanos Ruler: This component evaluates reporting and alerting rules against the query API.
Please note that other versions of Prometheus Operator may not be compatible with user-defined monitoring.
You can find further Documentation at the OpenShift-Documentation:
Setting up metrics collection for user-defined projects
Querying metrics for user-defined projects as a developer
Managing alerting rules for user-defined projects
OpenShift Capacity Management
This service allows you to monitor the resources of your cluster. And it will alarm us when resources like CPU, memory, disk or the redundancy of the worker nodes are critical.
The Prometheus captures a bunch of metrics of the cluster you can have a look on it. Metrics can be added to that Prometheus from us if requested.
- prometheus: monitor the resources of your cluster,
https://prometheus-nn-capmgt.apps.<<MY_DOMAIN>>
Metrics that are available by default:
- :node_memory_MemAvailable_bytes:sum
- container_memory_cache
- container_memory_rss
- container_memory_swap
- container_memory_working_set_bytes
- container_network_receive_bytes_total
- container_network_receive_packets_dropped_total
- container_network_receive_packets_total
- container_network_transmit_bytes_total
- container_network_transmit_packets_dropped_total
- container_network_transmit_packets_total
- container_cpu_usage_seconds_total
- container_spec_cpu_quota
- container_spec_cpu_period
- container_memory_usage_bytes
- container_spec_memory_limit_bytes
- cluster_version
- instance:node_cpu_utilisation:rate1m
- instance:node_load1_per_cpu:ratio
- instance:node_memory_utilisation:ratio
- instance:node_network_receive_bytes_excluding_lo:rate1m
- instance:node_network_receive_drop_excluding_lo:rate1m
- instance:node_network_transmit_bytes_excluding_lo:rate1m
- instance:node_network_transmit_drop_excluding_lo:rate1m
- instance:node_num_cpu:sum
- instance:node_vmstat_pgmajfault:rate1m
- instance_device:node_disk_io_time_seconds:rate1m
- instance_device:node_disk_io_time_weighted_seconds:rate1m
- kube_pod_status_phase
- kube_pod_container_status_restarts_total
- kube_namespace_labels
- kube_node_info
- kube_node_labels
- kube_node_role
- kube_node_status_allocatable
- kube_node_status_capacity
- kube_node_status_condition
- kube_persistentvolumeclaim_resource_requests_storage_bytes
- kube_pod_container_resource_limits
- kube_pod_container_resource_requests
- kube_pod_info
- kubelet_volume_stats_used_bytes
- kubelet_volume_stats_capacity_bytes
- kubelet_volume_stats_available_bytes
- kubelet_volume_stats_inodes_free
- kubelet_volume_stats_inodes_used
- node_uname_info
- node_memory_MemTotal_bytes
- node_memory_MemFree_bytes
- node_cpu_seconds_total
- node_filesystem_avail_bytes
- node_filesystem_size_bytes
- node_namespace_pod_container:container_cpu_usage_seconds_total:sum_irate
- node_namespace_pod_container:container_memory_cache
- node_namespace_pod_container:container_memory_rss
- node_namespace_pod_container:container_memory_swap
- node_namespace_pod_container:container_memory_working_set_bytes
- node_network_receive_bytes_total
- node_network_transmit_bytes_total
- node_network_receive_packets_total
- node_network_transmit_packets_total
- kube_resourcequota
- openshift_clusterresourcequota_selector
- openshift_clusterresourcequota_usage
Monitor your own applications with that prometheus
If you want to monitor your own applications you can use the Capacity Management Prometheus to scrape the data either to build your own prometheus and save the data or to build your own grafana with own dashboards.
You need to create an own service account located in your project and we will grant you the read access rights to the prometheus. Just send us a service request.
- prometheus: Url for the data source of grafana or scrape target for your own prometheus: https://prometheus-nn-capmgt.apps.<<MY_DOMAIN>>
If you want to build a Grafana Dashboard with the data you gather from the Prometheus you have to configure a custom HTTP Header with the follwoing values
Header: Authorization
Value: Bearer $TOKEN
You have to replace $TOKEN with the token of the service account. This token is stored in a secret which exists in the same namespace as the service account. The name of the secret could for example look something like this: prometheus-token-XXXX.
Should you have trouble with the checking of certificates please activate the “Skip TLS Verify” option.
Below is a picture in which all the places where changes need to be made are marked:

Dashboards: OpenShift4 on “Observe” tab at the GUI
https://console-openshift-console.apps.<<MY_DOMAIN>>/monitoring/dashboards/
- etcd: information about the etcd cluster
- Compute Resources/Cluster: information about the resources of each namespace/project, including quotas and network traffic
- Compute Resources/Namespace (Pods): like the Compute Resources/Cluster dashboard, but this dashboard depicts the resources of the pods for the selected namespace
- Compute Resources/Node (Pods): like the Compute Resources/Cluster dashboard, but this dashboard depicts the resources of the pods for the selected node
- Compute Resources/Pod: details about the selected pod from the selected namespace.
- USE Method/Cluster: like the Cluster Nodes dashboard, but this dashboard includes diagrams only for the nodes
- USE Method/Node: like the Cluster Nodes dashboard, but this dashboard includes diagrams only for the selected node
Example Template for an own Grafana
OpenShift Logging (Kibana)
Kibana is the comfortable way to access the cluster logs by webinterface. It contains application logs, cluster logs and audit logs. It can be accessed from: https://kibana-openshift-logging.apps.<<MY_DOMAIN>>/app/kibana
Setup first login
Create index pattern
At first login to kibana you need to define a index pattern.
Under “Step 1 of 2: Define index pattern” you can type "*" to create the default index pattern and go to “Next step”.
Then at “Step 2 of 2: Configure settings” you can select the time filter. There you can set the “@timestamp” filter for default.
Managed Container Services
Additionally to the OpenShift Platform noris network is providing "Managed Container Service(s)" (short: MCS). This contains the deployment and operation of application service workloads as container technology. The development of your application service is supported by the 24/7 operation of noris network - this forms an operating model with clear responsibility.
As a managed container service, noris network takes over the operational responsibility.
This is available for many types of applications, from standard business services to customer-specific applications. Application such as KeyCloak, ArgoCD and more can be consumed by you as managed container service.
For the many other applications or in-house developments, please contact noris network.